Vue怎么实现裁切图片功能
今天小编给大家分享一下Vue怎么实现裁切图片功能的相关知识点,内容详细,逻辑清晰,相信大部分人都还太了解这方面的知识,所以分享这篇文章给大家参考一下,希望大家阅读完这篇文章后有所收获,下面我们一起来了解一下吧。
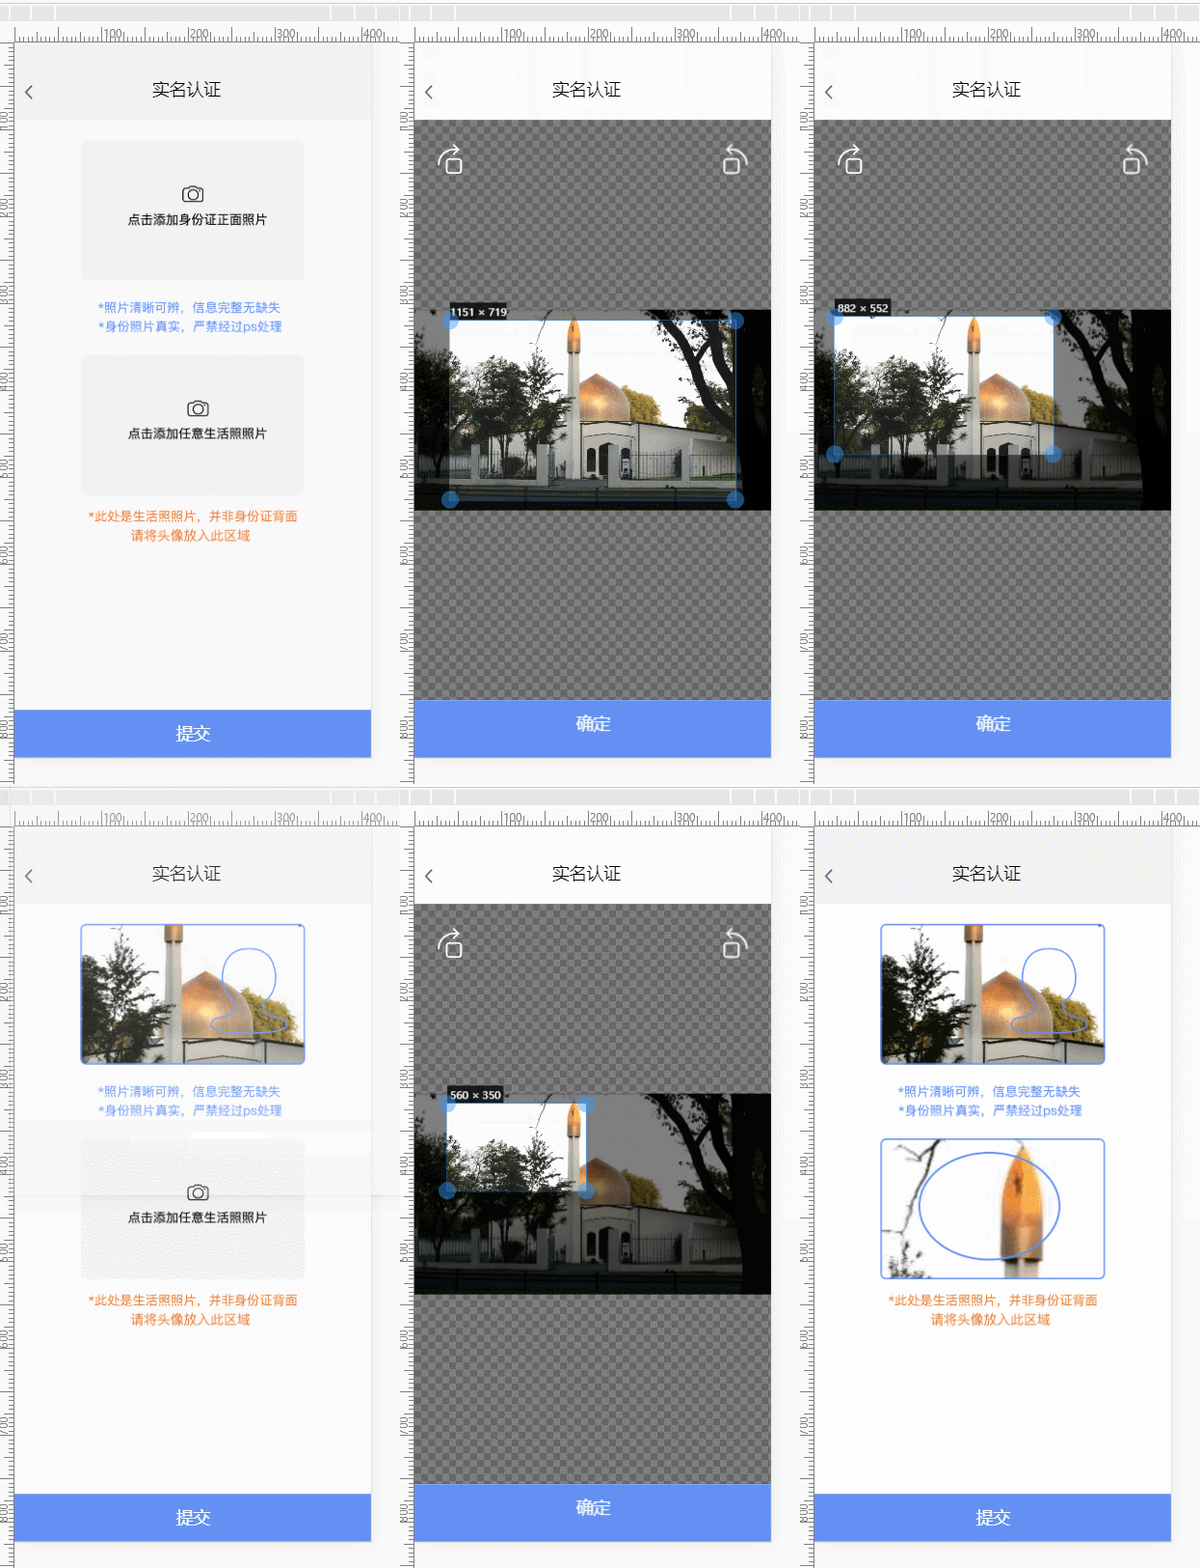
效果:

1)、安装 vue-cropper
npm install vue-cropper
2)、编写 .VUE 文件 cropper.vue 应为项目本身使用 mui
<template>
    <div>
        <div class="mui-fullscreen">

            <div class="top"  v-on:click="onBack()">
                <img src="../assets/img/payMent/fanhui@2x.png" >
                <p >实名认证</p>
            </div>

            <div >
                <!-- <img id="image" :src="image" > -->
                <img src="../assets/img/lobby/youxuanzhuan.png"
                 v-on:click="rotateLeft()" />
                <img src="../assets/img/lobby/zuoxuanzhuan.png"
                 v-on:click="rotateRight()" />


                <div class="cropperContent">

                    <vue-cropper ref="cropper" :img="option.img" :outputSize="option.size" :outputType="option.outputType" :info="true"
                     :full="option.full" :canMove="option.canMove" :canMoveBox="option.canMoveBox" :original="option.original"
                     :autoCrop="option.autoCrop" :fixed="option.fixed" :fixedNumber="option.fixedNumber" :centerBox="option.centerBox"
                     :infoTrue="option.infoTrue" :fixedBox="option.fixedBox" @realTime="realTime"></vue-cropper>


                </div>

                <!--                 <div >
                    <img :src="preview"  />
                </div> -->

            </div>


            <div class="buttom"
             v-on:click="onSelect()">
                <p >确定</p>
            </div>

            <!--             <img :src="preview"  /> -->

        </div>
    </div>
</template>

<script>
    import {
        VueCropper
    } from 'vue-cropper'
    export default {
        data() {
            return {
                target: 0,
                cropperHelp: null,
                preview: null,
                //裁剪组件的基础配置option
                option: {
                    img: '', // 裁剪图片的地址
                    info: true, // 裁剪框的大小信息
                    outputSize: 1, // 裁剪生成图片的质量
                    outputType: 'jpeg', // 裁剪生成图片的格式
                    canScale: false, // 图片是否允许滚轮缩放
                    autoCrop: true, // 是否默认生成截图框
                    autoCropWidth: 800, // 默认生成截图框宽度
                    autoCropHeight: 500, // 默认生成截图框高度
                    fixedBox: false, // 固定截图框大小 不允许改变
                    fixed: true, // 是否开启截图框宽高固定比例
                    fixedNumber: [16, 10], // 截图框的宽高比例
                    full: false, // 是否输出原图比例的截图
                    canMoveBox: true, // 截图框能否拖动
                    original: false, // 上传图片按照原始比例渲染
                    centerBox: true, // 截图框是否被限制在图片里面
                    infoTrue: true // true 为展示真实输出图片宽高 false 展示看到的截图框宽高
                },
            }
        },
        components: {
            VueCropper
        },
        methods: {
            //放大/缩小
            changeScale(num) {
                console.log('changeScale')
                num = num || 1;
                this.$refs.cropper.changeScale(num);
            },
            //坐旋转
            rotateLeft() {
                console.log('rotateLeft')
                this.$refs.cropper.rotateLeft();
            },
            //右旋转
            rotateRight() {
                console.log('rotateRight')
                this.$refs.cropper.rotateRight();
            },
            // 实时预览函数
            realTime(data) {
                //this.previews = data
            },
            imgLoad(msg) {
                console.log(msg)
            },
            cropImage() {

            },


            onSelect() {

                this.$refs.cropper.getCropBlob((data) => {
                    //console.log("data===>",data)
                    var img = window.URL.createObjectURL(data);
                    this.$emit("onCutingResoult", {
                        img: img,
                        target: this.target
                    })
                })
            },

            onReset(param) {
                this.target = param.target
                this.option.img = param.url
                this.preview = param.url
            },
            onBack() {
                this.$emit("onCutingBack")
            }
        }

    }
</script>

<style scoped>
    .mui-fullscreen {
        background: white;
    }

    .cropperContent {
        width: 100%;
        height: 100%;
    }

    /*     .mui-fullscreen {
        background: #F2F2F2;
        top: 0rem;
        bottom: 0rem;
    } */
</style>
以上就是“Vue怎么实现裁切图片功能”这篇文章的所有内容,感谢各位的阅读!相信大家阅读完这篇文章都有很大的收获,小编每天都会为大家更新不同的知识,如果还想学习更多的知识,请关注蜗牛博客行业资讯频道。
免责声明:本站发布的内容(图片、视频和文字)以原创、转载和分享为主,文章观点不代表本网站立场,如果涉及侵权请联系站长邮箱:niceseo99@gmail.com进行举报,并提供相关证据,一经查实,将立刻删除涉嫌侵权内容。版权声明:如无特殊标注,文章均为本站原创,转载时请以链接形式注明文章出处。


评论