Go语言自定义linter静态检查工具怎么实现
今天小编给大家分享一下Go语言自定义linter静态检查工具怎么实现的相关知识点,内容详细,逻辑清晰,相信大部分人都还太了解这方面的知识,所以分享这篇文章给大家参考一下,希望大家阅读完这篇文章后有所收获,下面我们一起来了解一下吧。
Go语言中的静态检查是如何实现?
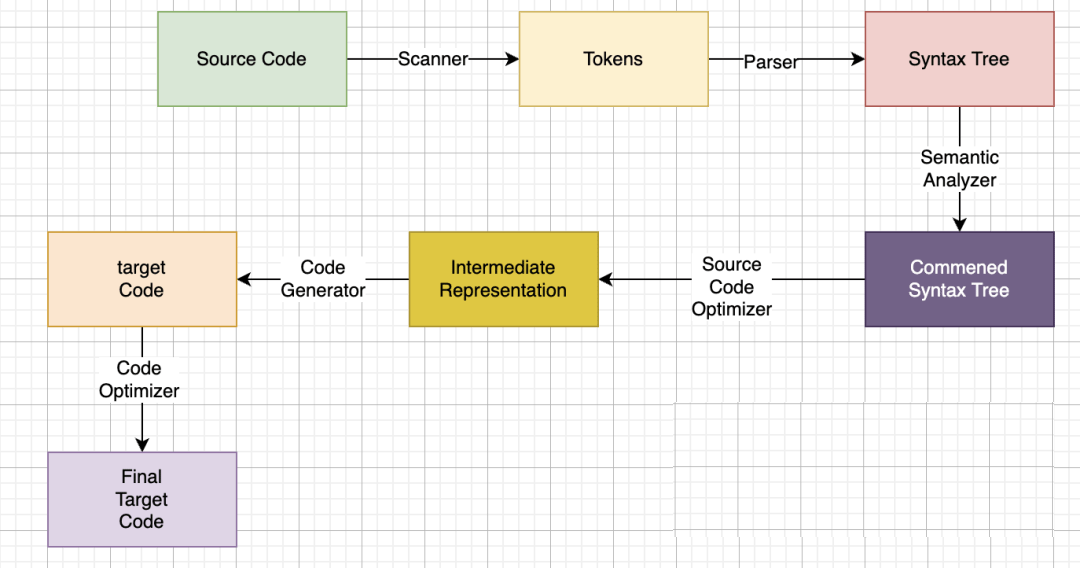
众所周知Go语言是一门编译型语言,编译型语言离不开词法分析、语法分析、语义分析、优化、编译链接几个阶段,学过编译原理的朋友对下面这个图应该很熟悉:

编译器将高级语言翻译成机器语言,会先对源代码做词法分析,词法分析是将字符序列转换为Token序列的过程,Token一般分为这几类:关键字、标识符、字面量(包含数字、字符串)、特殊符号(如加号、等号),生成Token序列后,需要进行语法分析,进一步处理后,生成一棵以 表达式为结点的 语法树,这个语法树就是我们常说的AST,在生成语法树的过程就可以检测一些形式上的错误,比如括号缺少,语法分析完成后,就需要进行语义分析,在这里检查编译期所有能检查静态语义,后面的过程就是中间代码生成、目标代码生成与优化、链接,这里就不详细描述了,这里主要是想引出抽象语法树(AST),我们的静态代码检查工具就是通过分析抽象语法树(AST)根据定制的规则来做的;那么抽象语法树长什么样子呢?我们可以使用标准库提供的go/ast、go/parser、go/token包来打印出AST,
查看AST,具体AST长什么样我们可以看下文的例子;
制定linter规则
假设我们现在要在我们团队制定这样一个代码规范,所有函数的第一个参数类型必须是Context,不符合该规范的我们要给出警告;好了,现在规则已经定好了,现在我们就来想办法实现它;先来一个有问题的示例:
// example.go
package main
func add(a, b int) int {
 return a + b
}
对应AST如下:
*ast.FuncDecl {
     8  .  .  .  Name: *ast.Ident {
     9  .  .  .  .  NamePos: 3:6
    10  .  .  .  .  Name: "add"
    11  .  .  .  .  Obj: *ast.Object {
    12  .  .  .  .  .  Kind: func
    13  .  .  .  .  .  Name: "add" // 函数名
    14  .  .  .  .  .  Decl: *(obj @ 7)
    15  .  .  .  .  }
    16  .  .  .  }
    17  .  .  .  Type: *ast.FuncType {
    18  .  .  .  .  Func: 3:1
    19  .  .  .  .  Params: *ast.FieldList {
    20  .  .  .  .  .  Opening: 3:9
    21  .  .  .  .  .  List: []*ast.Field (len = 1) {
    22  .  .  .  .  .  .  0: *ast.Field {
    23  .  .  .  .  .  .  .  Names: []*ast.Ident (len = 2) {
    24  .  .  .  .  .  .  .  .  0: *ast.Ident {
    25  .  .  .  .  .  .  .  .  .  NamePos: 3:10
    26  .  .  .  .  .  .  .  .  .  Name: "a"
    27  .  .  .  .  .  .  .  .  .  Obj: *ast.Object {
    28  .  .  .  .  .  .  .  .  .  .  Kind: var
    29  .  .  .  .  .  .  .  .  .  .  Name: "a"
    30  .  .  .  .  .  .  .  .  .  .  Decl: *(obj @ 22)
    31  .  .  .  .  .  .  .  .  .  }
    32  .  .  .  .  .  .  .  .  }
    33  .  .  .  .  .  .  .  .  1: *ast.Ident {
    34  .  .  .  .  .  .  .  .  .  NamePos: 3:13
    35  .  .  .  .  .  .  .  .  .  Name: "b"
    36  .  .  .  .  .  .  .  .  .  Obj: *ast.Object {
    37  .  .  .  .  .  .  .  .  .  .  Kind: var
    38  .  .  .  .  .  .  .  .  .  .  Name: "b"
    39  .  .  .  .  .  .  .  .  .  .  Decl: *(obj @ 22)
    40  .  .  .  .  .  .  .  .  .  }
    41  .  .  .  .  .  .  .  .  }
    42  .  .  .  .  .  .  .  }
    43  .  .  .  .  .  .  .  Type: *ast.Ident {
    44  .  .  .  .  .  .  .  .  NamePos: 3:15
    45  .  .  .  .  .  .  .  .  Name: "int" // 参数名
    46  .  .  .  .  .  .  .  }
    47  .  .  .  .  .  .  }
    48  .  .  .  .  .  }
    49  .  .  .  .  .  Closing: 3:18
    50  .  .  .  .  }
    51  .  .  .  .  Results: *ast.FieldList {
    52  .  .  .  .  .  Opening: -
    53  .  .  .  .  .  List: []*ast.Field (len = 1) {
    54  .  .  .  .  .  .  0: *ast.Field {
    55  .  .  .  .  .  .  .  Type: *ast.Ident {
    56  .  .  .  .  .  .  .  .  NamePos: 3:20
    57  .  .  .  .  .  .  .  .  Name: "int"
    58  .  .  .  .  .  .  .  }
    59  .  .  .  .  .  .  }
    60  .  .  .  .  .  }
    61  .  .  .  .  .  Closing: -
    62  .  .  .  .  }
    63  .  .  .  }
方式一:标准库实现custom linter
通过上面的AST结构我们可以找到函数参数类型具体在哪个结构上,因为我们可以根据这个结构写出解析代码如下:
package main
import (
 "fmt"
 "go/ast"
 "go/parser"
 "go/token"
 "log"
 "os"
)
func main() {
 v := visitor{fset: token.NewFileSet()}
 for _, filePath := range os.Args[1:] {
  if filePath == "--" { // to be able to run this like "go run main.go -- input.go"
   continue
  }
  f, err := parser.ParseFile(v.fset, filePath, nil, 0)
  if err != nil {
   log.Fatalf("Failed to parse file %s: %s", filePath, err)
  }
  ast.Walk(&v, f)
 }
}
type visitor struct {
 fset *token.FileSet
}
func (v *visitor) Visit(node ast.Node) ast.Visitor {
 funcDecl, ok := node.(*ast.FuncDecl)
 if !ok {
  return v
 }
 params := funcDecl.Type.Params.List // get params
 // list is equal of zero that don't need to checker.
 if len(params) == 0 {
  return v
 }
 firstParamType, ok := params[0].Type.(*ast.SelectorExpr)
 if ok && firstParamType.Sel.Name == "Context" {
  return v
 }
 fmt.Printf("%s: %s function first params should be Context\n",
  v.fset.Position(node.Pos()), funcDecl.Name.Name)
 return v
}
然后执行命令如下:
$ go run ./main.go -- ./example.go
./example.go:3:1: add function first params should be Context
通过输出我们可以看到,函数add()第一个参数必须是Context;这就是一个简单实现,因为AST的结构实在是有点复杂,就不在这里详细介绍每个结构体了,可以看曹大之前写的一篇文章:golang
和 ast
方式二:go/analysis
看过上面代码的朋友肯定有点抓狂了,有很多实体存在,要开发一个linter,我们需要搞懂好多实体,好在go/analysis进行了封装,go/analysis为linter
提供了统一的接口,它简化了与IDE,metalinters,代码Review等工具的集成。如,任何go/analysislinter都可以高效的被go
vet执行,下面我们通过代码方式来介绍go/analysis的优势;
新建一个项目代码结构如下:
.
├── firstparamcontext
│   └── firstparamcontext.go
├── go.mod
├── go.sum
└── testfirstparamcontext
    ├── example.go
    └── main.go
添加检查模块代码,在firstparamcontext.go添加如下代码:
package firstparamcontext
import (
 "go/ast"
 "golang.org/x/tools/go/analysis"
)
var Analyzer = &analysis.Analyzer{
 Name: "firstparamcontext",
 Doc:  "Checks that functions first param type is Context",
 Run:  run,
}
func run(pass *analysis.Pass) (interface{}, error) {
 inspect := func(node ast.Node) bool {
  funcDecl, ok := node.(*ast.FuncDecl)
  if !ok {
   return true
  }
  params := funcDecl.Type.Params.List // get params
  // list is equal of zero that don't need to checker.
  if len(params) == 0 {
   return true
  }
  firstParamType, ok := params[0].Type.(*ast.SelectorExpr)
  if ok && firstParamType.Sel.Name == "Context" {
   return true
  }
  pass.Reportf(node.Pos(), "''%s' function first params should be Context\n",
   funcDecl.Name.Name)
  return true
 }
 for _, f := range pass.Files {
  ast.Inspect(f, inspect)
 }
 return nil, nil
}
然后添加分析器:
package main
import (
 "asong.cloud/Golang_Dream/code_demo/custom_linter/firstparamcontext"
 "golang.org/x/tools/go/analysis/singlechecker"
)
func main() {
 singlechecker.Main(firstparamcontext.Analyzer)
}
命令行执行如下:
$ go run ./main.go -- ./example.go
/Users/go/src/asong.cloud/Golang_Dream/code_demo/custom_linter/testfirstparamcontext/example.go:3:1: ''add' function first params should be Context
如果我们想添加更多的规则,使用golang.org/x/tools/go/analysis/multichecker追加即可。
集成到golang-cli
我们可以把golang-cli的代码下载到本地,然后在pkg/golinters 下添加firstparamcontext.go,
代码如下:
import (
 "golang.org/x/tools/go/analysis"

 "github.com/golangci/golangci-lint/pkg/golinters/goanalysis"

 "github.com/fisrtparamcontext"
)
func NewfirstparamcontextCheck() *goanalysis.Linter {
 return goanalysis.NewLinter(
  "firstparamcontext",
  "Checks that functions first param type is Context",
  []*analysis.Analyzer{firstparamcontext.Analyzer},
  nil,
 ).WithLoadMode(goanalysis.LoadModeSyntax)
}
然后重新make一个golang-cli可执行文件,加到我们的项目中就可以了。
以上就是“Go语言自定义linter静态检查工具怎么实现”这篇文章的所有内容,感谢各位的阅读!相信大家阅读完这篇文章都有很大的收获,小编每天都会为大家更新不同的知识,如果还想学习更多的知识,请关注蜗牛博客行业资讯频道。
免责声明:本站发布的内容(图片、视频和文字)以原创、转载和分享为主,文章观点不代表本网站立场,如果涉及侵权请联系站长邮箱:niceseo99@gmail.com进行举报,并提供相关证据,一经查实,将立刻删除涉嫌侵权内容。


评论